Sacral Torsion About an Oblique Axis… A New Approach to an Old Problem
by Jerry Hesch, MHS, PT
Read this very informative chapter in its entirety in the Dynamic Body Textbook
The book is also a part of the 32 CE Lower Body Home-Study
Performing Hesch springing
In spite of any appearance to the contrary, Springing with Awareness SM is a simple, straightforward TOOL available to clinicians who routinely evaluate soft tissues. This method of spring/micro-motion testing is simply an enhancement of the skill set of soft tissue evaluation, so that it can be performed on denser connective tissue.
Spring/micro-motion testing is a challenging read, and the readers are encouraged to first observe video on the topic to appreciate the simplicity and the sequential manner in which it is performed. Viewing the videos should make the reading much easier, by providing a dynamic visual frame of reference.
Searching YouTube.com using the key words “Jerry Hesch,” then “sacroiliac spring test” will lead you to several video demonstrations that contrast Springing with AwarenessSM with the traditional forward-thrust method. One video addresses false-negative and false-positive tests. These concepts are quite relevant, especially if the concept of springing is novel to the reader.
For the rest of this chapter, any use of the terms spring, spring/micro-motion, springing, or Springing with Awareness refers to the Hesch Springing with AwarenessSM technique, unless stated otherwise.
When preparing to do a spring test, be sure to orient the direction of force to the anatomical plane that is altered by the patient’s position, so that the direction of force is, indeed, a pure P-A directed spring/micro-motion test that is perpendicular to the posterior face of the sacrum. Initially, this method can seem challenging, but it can be easily learned with a little practice, while slowly reading the sequence with your hands on an anatomical model or volunteer. With practice, each spring/micro-motion test can be performed with three repetitions in 10 seconds or less.
Below, the procedure is abbreviated one line at a time
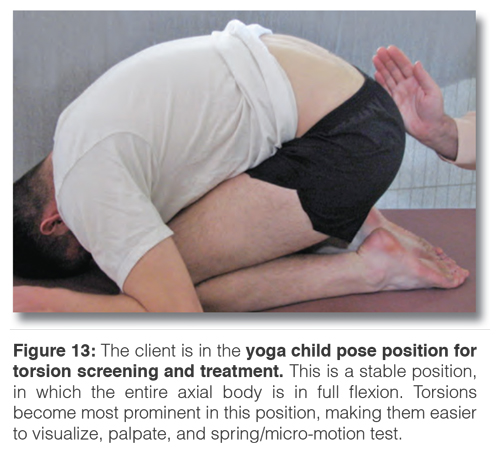
Palpate the sacral quadrants in yoga child pose (Fig. 13).
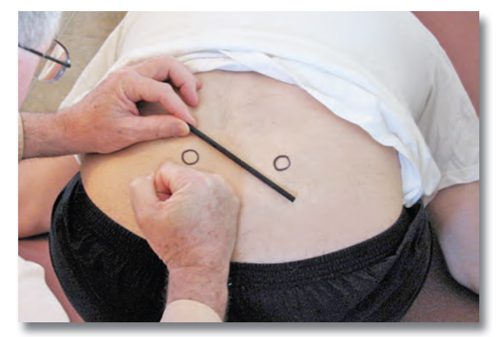
Step 1: Position hand to perform spring/micro-motion test with zero pounds on one quadrant (Fig. 14).
Step 2: Take up the SLACK using 10 pounds.
Step 3: Impart spring/micro-motion with an additional 10 pounds. The total force on the sacrum is now 20 pounds.
Allow the recoil to return to Position 2, maintaining the 10-pound position.
Repeat spring/micro-motion tests as desired, going from Position 2 to 3 and back to 2 as necessary.
Step 4: When finished springing, briefly hold the final 10 pounds and then let go to zero pounds.
Step 5: Repeat the entire test at the other three sacral quadrants.
Springing a sacral torsion
The above method of springing will work on sacral quadrants and joints that have normal mobility. The sacrum will behave differently when torsion is present. If torsion is present, you will be able to spring three sacral quadrants. However, you will not be able to take up the slack on the prominent and stuck sacral quadrant in yoga child pose, nor in prone neutral a small percentage of the time.
Even by increasing the force to 20 pounds or somewhat greater, the joint will not spring. In time, you will easily realize that the prominent sacral quadrant is always the stuck one, and you can skip the spring/micro-motion test and directly proceed to treatment.
Learn more about our Lower Body Home-Study course.
On sale this week only!
Save 25% off the "Dalton Technique Treasures" eCourse
The “Dalton Technique Treasures” eLearning course is a compilation of some of Erik’s favorite Myoskeletal Alignment Techniques (MAT). Learn MAT techniques to assess and address specific sports injuries, structural misalignment, nervous system overload, and overuse conditions. ON SALE UNTIL July 29th! Get Lifetime Access: As in all our eLearning courses, you get easy access to the course online and there is no expiry date.

